User Guide
DataVault Password Manager for Mac
Overview
DataVault Installation
Quick Start
Master Password
Password Hint
Adding an Item
Editing an Item
Deleting an Item
Viewing Items in a Tree
Viewing Items in a List
Searching for Items
Categories & Types
Templates
Password Generator
Security Timeout
Backup Restore
Automatic Backups
Safari Autofill Extension
Synchronizing
Synchronizing with Wi-Fi
Synchronizing with Dropbox
Synchronizing with iCloud
Importing & Exporting
Importing from 3rd Party Applications
Importing from 1Password
Importing from Keeper
Importing from Lastpass
Importing from Dashlane
Importing from mSecure
Importing from SplashID
Support
Overview
DataVault for Mac is a secure password manager that allows you to store personal information such usernames, passwords, PINs, etc. using Advanced Encryption Standard (AES), the most powerful encryption technology to secure confidential information.
To install DataVault for Mac version 5 and above from the Mac App Store, simply tap on the Install App button that appears after purchase. DataVault will download to the Mac Launchpad. From there you can drag and drop the app icon to the Mac Doc for easy access.
To install DataVault for Mac version 4, follow the instructions on the FAQ page to download DataVaultSetup.pkg then double-click on the filename and follow the prompts. By default, DataVault will be installed in the Mac OS Applications folder. You can select a different folder by clicking on the "Change Install Location ...". During installation, an encrypted file called DataVault.db is created in the Documents folder. You can make a copy of this file to use as a
backup. If you erase this file and restart DataVault, a new file will be created with sample items. Once you have completed Installation, you can start DataVault by opening the Applications folder
and clicking on DataVault.
When you start DataVault for the first time, you will be prompted to create a master password and an optional hint question. Choose a master password
and enter it again to make sure you don't make a mistake, then click on the Ok button.
DataVault protects your confidential information by requiring you to enter a master password each time you start the application.
The master password is used to encrypt and decrypt your data. When you first start DataVault, you will be prompted to select a master password,
then enter it a second time to make sure you don't make a mistake.
A password hint is an optional security setting that you can use to obtain your master password if you forget it. The password hint consists of a
question and answer of your choosing. For example, you might enter "What was my fist telephone number?" as the question and then enter the correct answer to
be stored in DataVault. If you forget your master password, you can click on the "Password Hint" button in the login window. DataVault will display the hint
question and prompt you for the answer. If you enter the correct answer, your master password will appear.
To create an item, click on the plus botton + button under the Item Details panel. You can select a template from the drop down list
to automatically choose an item icon and item field labels.
To modify an item, double-click on the item name in tree or list view (left-hand panel). Alternatively, you can click on the item name to highlight it, then click on the
Edit button below the Item Details panel.
To delete an item, click on the item name in tree or list view then click on the minus button below the Item Details panel.
To view items in a tree formation organized by category and type, click on the Tree View button in the toolbar. If the number of items exceeds the screen size,
a slider bar will appear to the right of the tree. Use the slider to move up and down the tree.
To view items in an alphabetical list, click on the "List View" button in the toolbar. If the number of items exceeds the screen size, a slider bar
will appear to the right of the list. Use the slider bar to move up and down the list. Use the horizontal slider bar at the bottom of the list to move across fields.
To find an item, click inside the Search field in the toolbar and begin typing. Each time you type a character, the tree or list of items will reduce
to include only items containing the search string. For example if you type car, items such
as Mastercard and Car Registration will appear in the list. Clicking on the Escape key will clear
the search field and display all items.
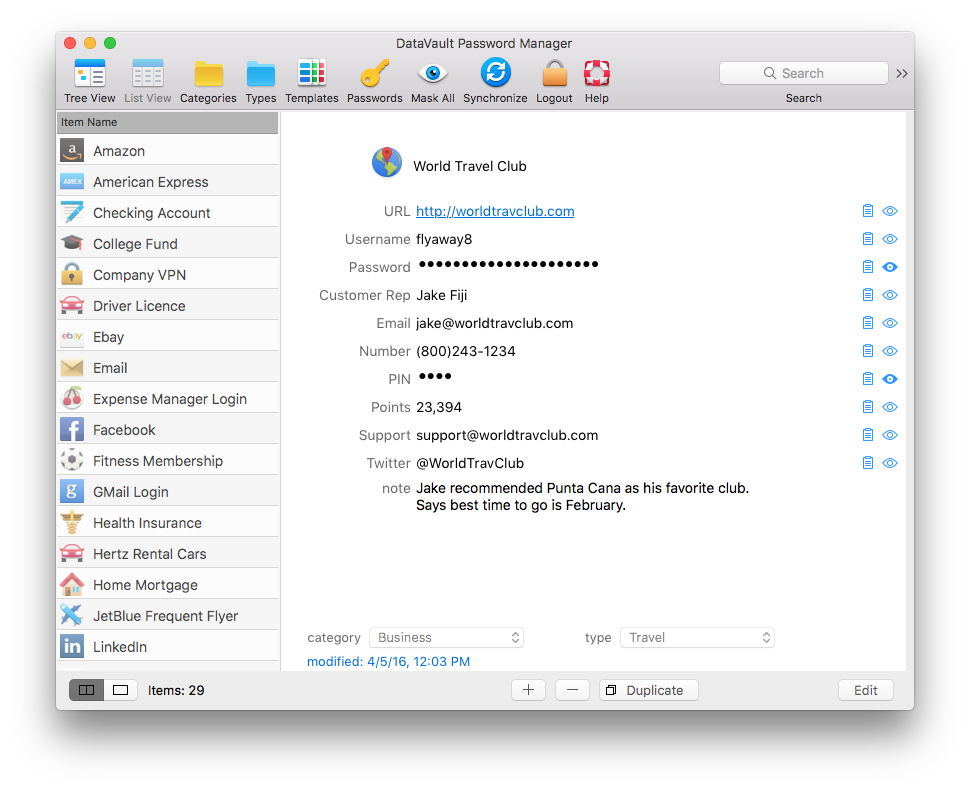
Items can be grouped into categories such as Business, Personal, etc. Each category can include several types such as Credit Cards, Logins and Memberships.
An Unfiled category and Unfiled type are created when DataVault starts for the first time. These folders cannot be deleted.
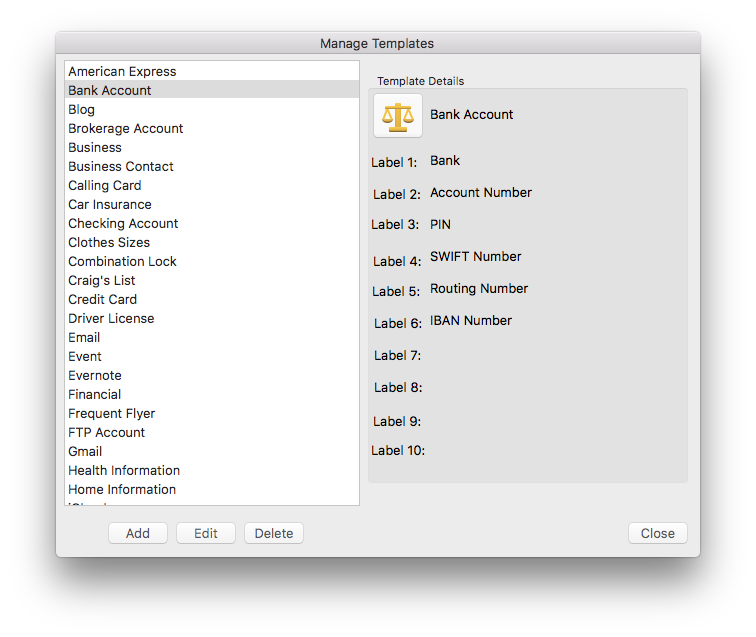
Templates allow you to set default icons and field labels for items that are similar. For example, all credit cards have a number, expiration date and
security code. Instead of entering the same field labels each time you create a credit card item, you can select the Credit Card template which will fill the
field labels automatically.
The password generator can be used to suggest new passwords based on user-defined settings, see image below. To invoke the password generator,
click on the Passwords button in the toolbar.
You can set the length of a password and choose the types of characters it contains. When you have finished choosing password settings, click on
the Regenerate button to display a new password.
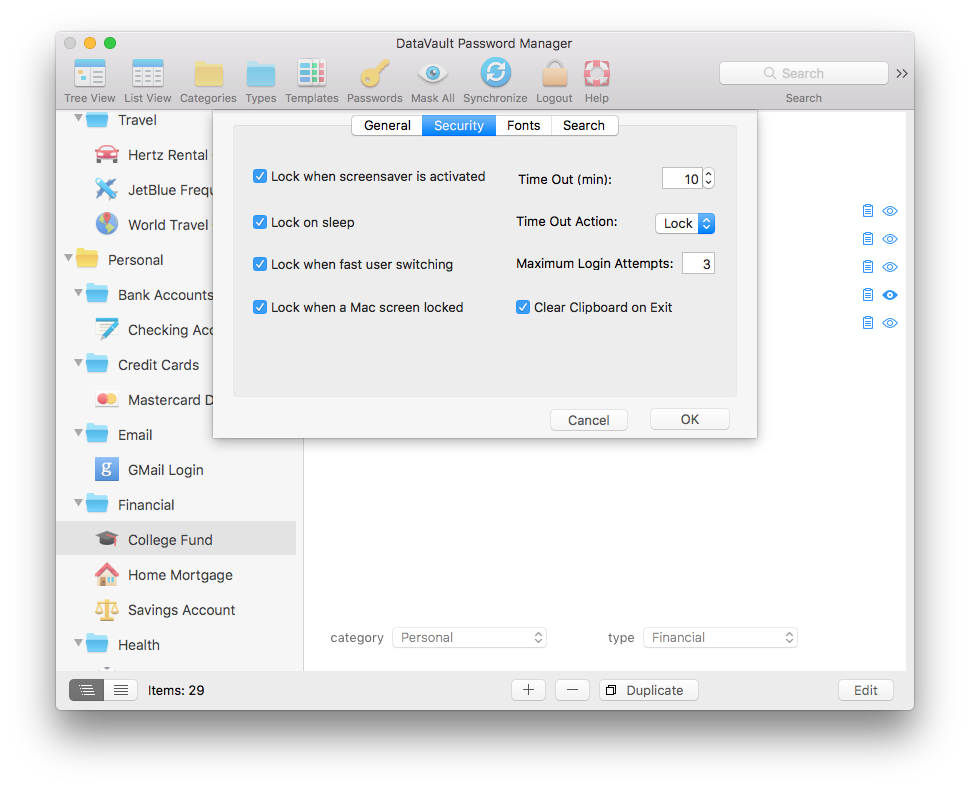
DataVault monitors your usage to determine if there are periods of inactivity that may indicate you stepped away from your computer. After an user selected
inactivity delay, DataVault will close the main window and display the master password login window.
Masking field values displays the characters as stars. You can toggle between "stars" and the the actual field contents by
clicking on the eye icon to the right of the field. This can be useful if you are concerned that somebody will see a password while
you are using DataVault.
You can create a secure copy of all the items, categories, types and templates stored in DataVault using the backup feature. You can restore the data from this
backup in case your computer is stolen, your hard drive crashes or you change computers.
DataVault for Mac provides settings to manage automatic backups. To access these settings, click on the Preferences from the menu bar,
then check off the box marked "Allow Automatic Backups".
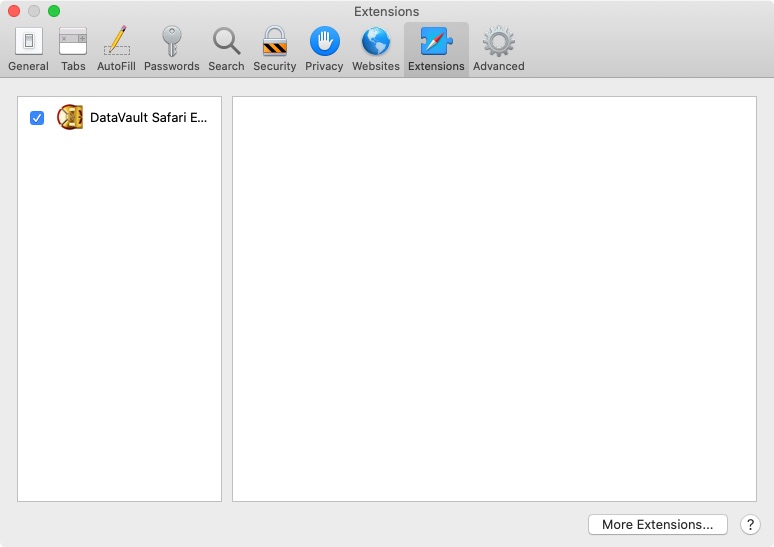
DataVault for Mac version 7.0.39 and above includes a Safari extension that you can use to autofill website logins. The extension requires macOS version 10.14 and above. To use the DataVault Safari Extension, make sure it is installed correctly and enabled in Preferences.
DataVault for Mac can synchronize items, categories and types with DataVault running on other devices.
To configure Wi-Fi sync, go to File > Synchronization Settings, select Syncing Using Wi-Fi or Direct Internet Connection and click OK.
DataVault for Mac can synchronize with DataVault for iOS, Android and Windows using Dropbox,
a popular data storage service. To synchronize using Dropbox you must create a free Dropbox account. Install Dropbox on all devices
and follow the steps below.
If you purchased DataVault Premium, an option should appear in Settings > Synchronization > Dropbox called "Dropbox auto-sync". If you
tap the switch to enable auto-sync, DataVault will keep an encrypted copy of the data file in your Dropbox cloud storage.
When auto-sync is enabled on a device, DataVault will automatically check for updates on Dropbox and prompt you to
sync if necessary. If you make updates on the device, DataVault will update the data file on Dropbox so other devices
can sync with them.
DataVault for Mac can synchronize with DataVault for iOS using iCloud or iCloud Drive. However, it is important to note that Synchronizing over iCloud Drive
requires iOS 8 and OS X Yosemite. If you upgrade from iCloud to iCloud Drive on one platform but not the other, you will no longer be able to synchronize
using iCloud. Developers cannot provide a work around to this limitation so make sure to upgrade on both platforms or use another synchronization
method while waiting.
DataVault for Mac OS allows you to import and export items in DataVault Exchange format (DVX). To export data from DataVault, click on Tools > Export... in the DataVault text menu. To import a DVX file into DataVault for Mac OS, select File > Import DVX from the text menu. DVX files do not contain category and type information for items.
DataVault for Mac allows you to import data directly from the following 3rd party applications: SplashID, mSecure, 1Password, Keepass, Passwords Plus, Turbo Passwords,
Cryptmagic and Minisafe.
Please check our Support Page for further information, a troubleshooting FAQ and
contact information for technical support.
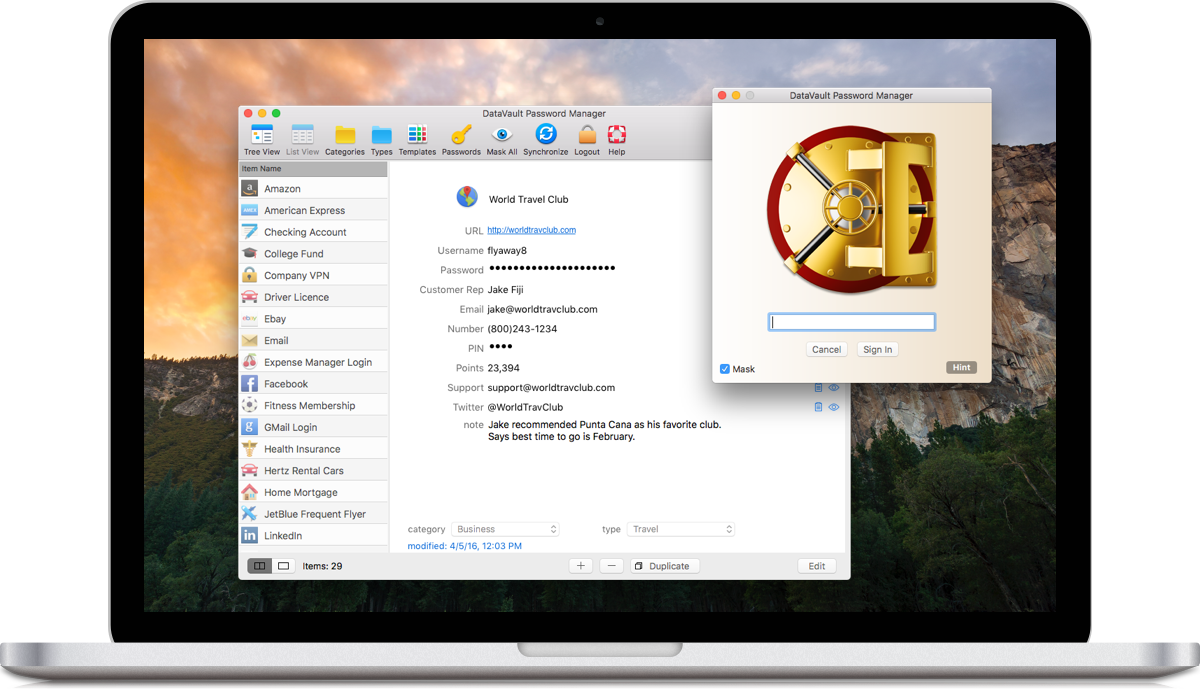
Each item you store in DataVault comprises an item name, icon, notes and up to ten additional pieces of information. For example, a credit card item may include fields
such as credit card type, number, expiration date, security code, issuing bank, web site address, username, password as well as notes from a recent discussion with
customer service. You can change the labels associated with each field to personalize the item's format.
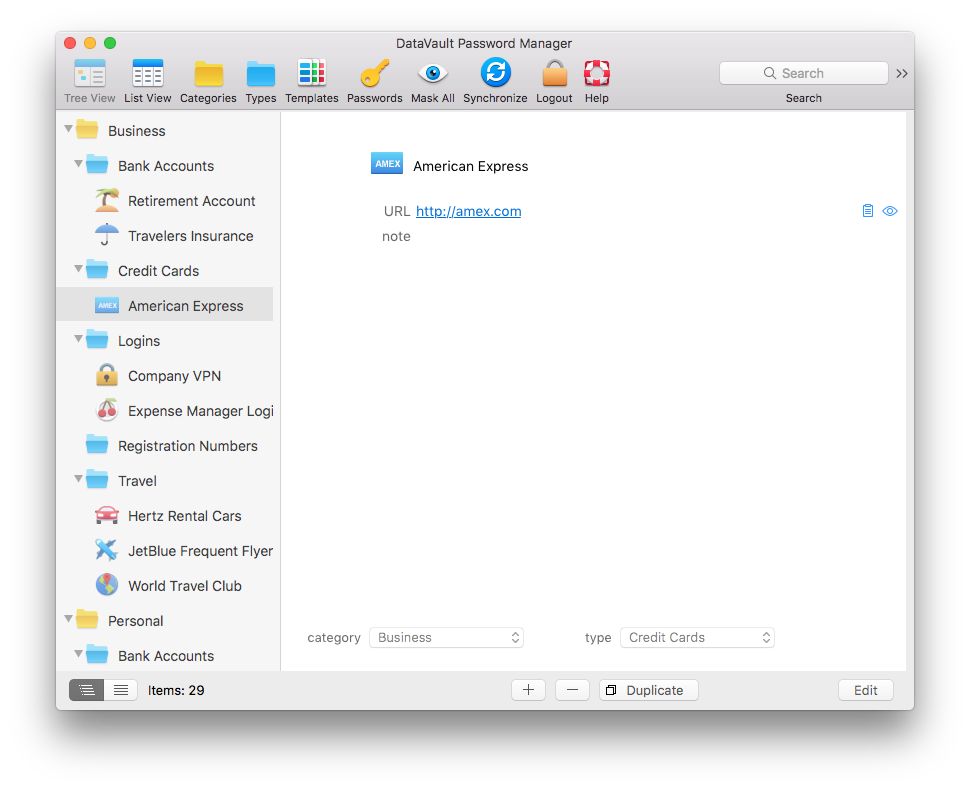
Items can be grouped into categories and types so you can organize them in an intuitive way. For example, you might use categories such as Business and Personal and
types such Credit Cards, Bank Accounts and Logins. This would allow you to store a company American Express Card with other work-related items and a personal Visa Card
along with logins for web sites you use at home. DataVault provides a set of default categories and types but you can add as many as you like and move items from one to
another.
Templates are used in DataVault to help you enter items quickly and in a consistent manner. You can select a template when you add an item and DataVault will automatically
fill the field labels and select the item icon. For maximum flexibility, templates are independent of categories and types. This allows you to use a "Mastercard" template
with any category or type. By default, DataVault provides twenty-five templates but you can add as many as you like.
The DataVault user interface has been optimized for use with mobile devices while remaining consistent with familiar desktop environments. Items can be displayed in a list
or in a tree similar to desktop file managers. List view displays items in alphabetical order. Tree view displays items organized in folders by category and type.
For users with large numbers of items, searching on a string of characters may be quicker than navigating through a list or tree. DataVault offers the ability to customize
search to include field labels, contents or notes and take into account case sensitivity.
Numerous security features allow you to personalize how DataVault protects your data. You can enable a security time out to require a log in after an inactivity delay. DataVault also
provides field masking, a master password hint and a customizable password generator to help you keep your information safe.
Your Mac isn't the only place you need to use confidential information. For this reason, DataVault for Mac can be synchronized with
DataVault for iPhone, iPod Touch & iPad,
DataVault for Android and
DataVault for Windows (sold separately). DataVault provides several synchronization methods so you can chose the one
that best fits your needs.
The sections below describe the features of DataVault for Mac in detail. Additional information is available on our Support Page.
DataVault Installation
DataVault for Mac version 7.0.39 and above includes DataVault Extension for Safari to autofill website logins. The extension requires macOS version 10.14 and above. Before installing DataVault for Mac, close Safari. After installing DataVault for Mac, start Safari, tap Preferences > Extensions and check off the box next to DataVault Safari Extention.
DataVault for Mac OS version 4 comes with a 30-day trial period during which time you can use the application for free. To use this version of DataVault beyond the trial period,
you must enter a registratino key which will be sent by email when you complete the purchase process.
Quick Start
DataVault will display sample items, categories and types in a tree formation, see image below. You can edit or delete these samples at any time. To add
an item click on the plus button "+" under the Item Details panel on the right side of the main window.
To expand or collapse branches in the tree, click on the folder icons. To collapse or expand all levels in the tree, tap on the Expand
All, Collapse All buttons below the tree.
To switch between viewing modes, click on the "Tree View" or "List View" buttons in the toolbar.
Master Password
A stength meter indicates whether the password you select is Weak, Good or Strong. A password less than 8 characters is considered Weak. A password of 8 or more characters including numbers and upper & lower case letters is considered Good. A password greater than 12 characters containing numbers, upper & lower case charcters, and punctuation marks is considered Strong.
You can change your master password at any time by selecting Change Password from the File text menu.
PLEASE NOTE: It is very important that you store a copy of your master password in a secure place. If you lose you master password, there is no way
to get it back. It isn't stored anywhere in the app and even Ascendo is unable to retrieve it.
Password Hint
To create a password hint, enter a question and answer when setting up your master password.
Adding an Item
When you are done editing, tap on the Save button or Cancel.
Editing an Item
To change an item icon, click on the icon in the upper-left of the item details form. An icon matrix will appear. Click on an icon to select it and return to
the item details form.
To modify an item name, field labels, field contents or notes, click on the field and start typing.
If you enter a string of characters into the field contents starting with "https://", DataVault will assume it is an internet address (URL). After saving the
item, the URL will be displayed as underlined text. This signifies that you can click on the link to open your browser and go to the web page.
To use a template, click on the arrows to the right of the template field and select from the drop-down list. Choosing a template will automatically fill the form
with a default icon, field labels, category and type. For more information, please see the section on Templates.
To choose a category or type, click on he arrows to the right of the field and select from the drop-down list. Selecting a category and type will determine the
position of the item in tree view.
When you are done editing, click on the Save button below the Item Details panel or click on Cancel.
Deleting an Item
Viewing Items in a Tree
To expand or collapse a level in the tree, click on category or type folders. To expand or collapse all levels in the tree, click on the Expand All or
or Collapse All buttons below the tree.
You can change the position of types and items using drag and drop. To move a type, click and hold a type folder, drag it over a category and release it. To
move an item, click and hold an item, drag it over a type folder and release it.
Viewing Items in a List
To hide the Item Details panel and maximize the space available to display item fields, click on the Hide Details and Show Details buttons in the lower right of the window,
see image below.
Searching for Items
Categories & Types
To add, edit or delete a Category or Type, click on the appropriate button in the toolbar. If you delete a category or type, DataVault will ask you if you want to move
the items to the Unfiled folder or delete them permanently.
Templates
DataVault comes with a set of 25 pre-defined templates. To add, edit or delete templates click on the Template button in the toolbar
and use the buttons along the bottom of the window.
Password Generator
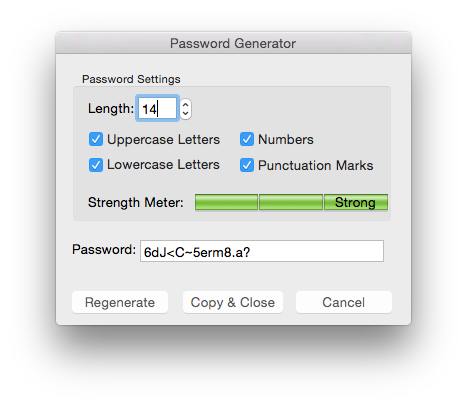
A strength meter displays whether the password is "Weak", "Good" or "Strong". The longer the password and the
more types of characters you include, the stronger the password is.
When you have created a password that you want to use, click on the "Copy & Close" button to copy the password to the Mac OS clipboard. The
password generator window will close and you can click in Command-V to paste the password into an item form. Click on Cancel to close the password generator without
copying the password to the Mac OS clipboard.
Security Timeout
To set the Security Timeout select Preferences in the DataVault menu bar and set the number of minutes for the inactivity delay.
Masking Field Values
To mask a field click on the mask icon to the right of the field value in the item details form. Click once to mask
the field and a second time to unmask the field. The Mask button in the toolbar will toggle all masked fields in list view and in the item
details form.
Backup and Restore
To backup your data, click on the File option in the DataVault menu bar, then select Backup. Your data will be encrypted using your master password.
To restore the data, select File > Restore and enter the master password used to backup the data.
Automatic Backups
A backup will be made each time you quit DataVault after having modified information. Each
backup will include a timestamp in the file name so you can go back to older backups in case you overwrite important information. DataVault conforms with
Apple's App Sandboxing guidelines to protect data against malicious software so
the files are not readily available thought Finder. To restore automatic backups, select File > Restore from the menu bar and a dropdown list with
recent automatic backups will appear.
Automatic backups are stored in a protected folder. To access this folder, start Finder and select Go from the menu. With the Go menu still showing, click on the Mac alt/option key and Library will appear in the menu. Click on Library, then to go Containers/com.ascendo.DataVaultMac/Data/Library/Application Support/DataVault Password Manager/Backups.
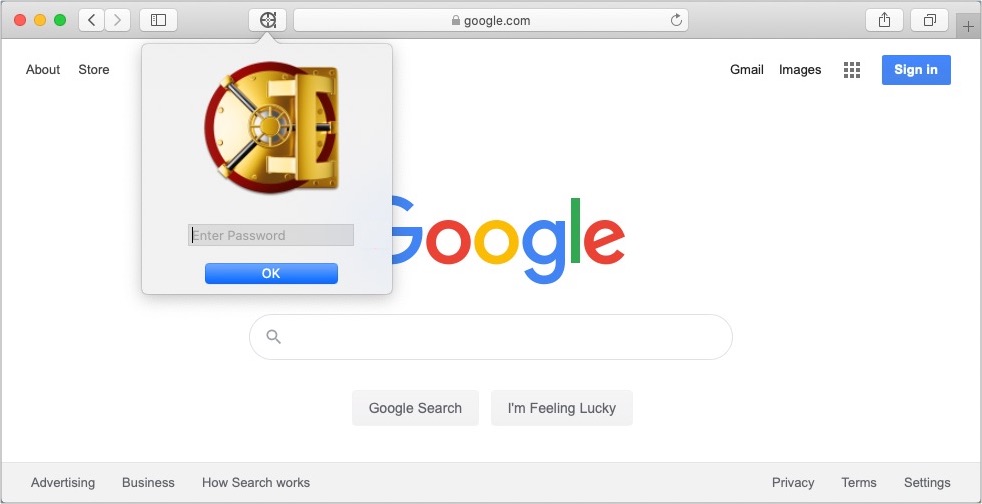
Safari Autofill Extension
To use the extension, tap on the DataVault in the Safari menu bar and login if necessary. Tap the name of the item in the search bar and select the desired login. Please note that items will only appear in the list if the first field label is URL, the second field label is Username and the third is Password. You can enter these labels manually or select Login from Templates.
If the item is entered correctly, selecting it from the Safari Extension drop down list should open a browser tab, open the URL and automatically enter the username and password.
Synchronizing
DataVault implements 2-way synchronization so that all additions, edits and deletions are taken into account regardless of the device
on which they are initiated. If the same piece of information is modified on two devices then DataVault prompts the user to choose
which version to keep. This is called conflict resolution.
To synchronize DataVault between several devices, the passwords on each must be the same. You can verify the password on a device
by using the unmask feature before you login. To modify a password select Change Password from the Options menu.
Before synchronizing, go to File > Synchronization Settings and select configuration options, see image below. Once configuration is complete,
you can click on the Synchronization button in the menu bar to initiate manual synchronization methods such as Wi-Fi. Other methods such as
iCloud and Dropbox provide automatic synchronization.
Troubleshooting tips can be found in the Frequently Asked Questions pages (FAQs) located on the
Support Page.
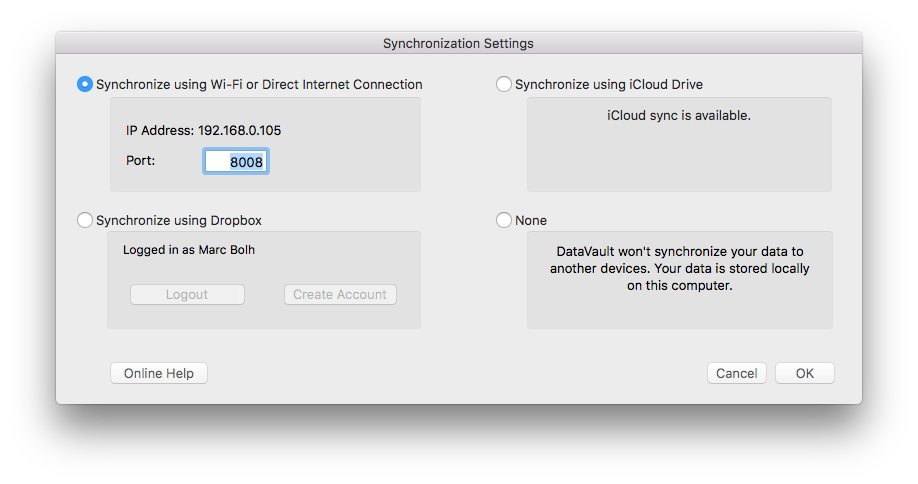
Syncing Using Wi-Fi
Return the main menu and select File > Synchronize. A window will appear indicating the IP address that will be used for synchronization.
Now start DataVault on another device and initiate Synchronization using Wi-Fi. Depending on the platform, you should see a screen to
initiate synchronization including fields for the IP Address and Port. Verify that these values are the same as in DataVault for Mac
or change them if necessary. Do not close the synchronization window until synchronization has completed. Then click on Synchronize Now
on both devices.
Alternatively, you can enter the IP address before selecting a device on your Wi-Fi network by selecting "Manually". Entering an IP address manually will allow DataVault for iPhone, iPad or iPod Touch to connect to DataVault for Mac over a fixed line (Ethernet) cable but requires your Mac to have a fixed IP address. Devices running iOS version 3.2 or above can use application file sharing to synchronize by following the steps below.
Synchronizing Using Dropbox
Synchronizing Using iCloud
Synchronizing over iCloud requires that you have an iCloud account and that
you are signed in on all devices, see System Preferences > iCloud on your Mac. Once you have verified this, go to File > Synchronize Settings
and select Synchronize using iCloud. On iOS devices, go to Tools & Settings > Synchronization > iCloud and tap on the iCloud Sync switch.
Modifications on one device may take several minutes to update on all devices. If you are experiencing delays longer that 10 minutes, click on the
Synchronization button in the menu bar to provoke an iCloud synchronization. On iOS devices, go to Settings > Synchronization > iCloud and tap on
Sync Now. If you are still having issues, try restarting DataVault on all devices.
Importing & Exporting
Importing from 3rd Party Applications
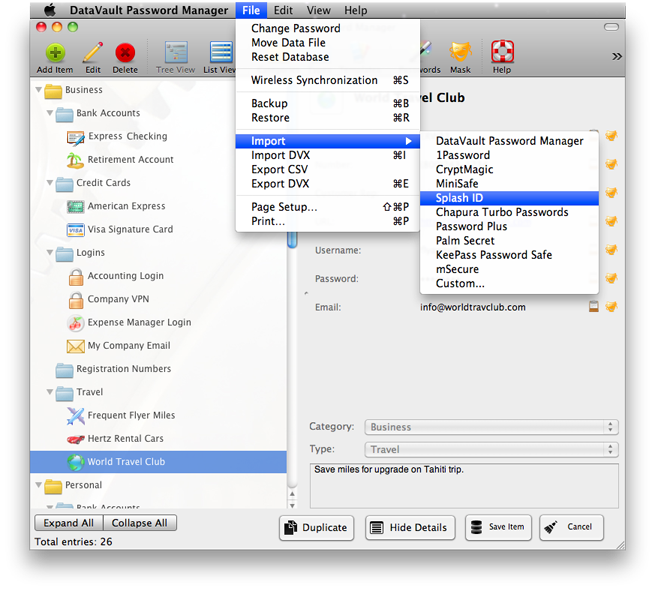
To import data, you will first need to export it from the 3rd party application. Exporting is different for each application but in general you should select a
text delimited format such as comma separated values (CSV). Then select File > Import from the DataVault for Mac menu bar and choose the application you
want to import from (see image below). Browse to the file location and select the file.
More detailed instructions for importing data into DataVault can be found for SplashID,
mSecure, and
1Password.
Support