Importing from YAPS into Ascendo DataVault
by Marty Brown
If you have selected to import a CSV file from a password manager like YAPS (Yet Another Password Safe), that is not specifically listed in the DataVault Desktop > Tools > Import function, you can use a three step process to bring your records into DataVault.
Step 1: Prepares your records in a CSV file to be imported to DataVault
Step 2: Prepares DataVault’s import function to use the CSV file on these records
Step 3: Processes the import and shows you the results.
Step 1 - Prepare the CSV file
Non-supported password managers have various ways of exporting records, but most will export either to a CSV file or to a text document. If your old program exports directly to a CSV file, you can skip to Step 1.1
If you have a memo or text file export from your old program, you need to reformat this as a Comma Separated Value format file. This is easier than it sounds, assuming you have access to Excel. Open the text or memo file, copy all that information into the clipboard, then paste that data into a blank Excel sheet. Save it using the Save As command and select the CSV format. You will receive a warning about CSV formats not being completely compatible with Excel file properties.
Now, what kind of information does your file show? Depending on how ‘structured’ your old password manager was, it could be very organized or very random. You might have stray characters in the data that need to be eliminated. For example, YAPS, a password manager program from the Palm platform outputs a memo field that look like this:
#Yaps Data,1#
#Yahoo Mail account,me@yahoo.com,mypassword,,
#Main Street Bank, ATM,,1234,,
#Fidelity 401k account,123-45-3444,Boogie101,,watch the Contra Fund
#Work network,name,mypassword,,
The first line is just a memo title field and can be deleted. The # sign is simply a line break character and can be eliminated. The commas separate the general record layout of Record Name, Username, password, info and notes.
Now, use the Data Text to Columns command to parse the data into separate columns. You will be asked to choose a “delimiter” or a character or space between each entry on each row that will be used to break the lines into separate columns. This will often be either a space or a comma, but might be a tab.
When you finish this portion, save the file, then insert two rows at the top of the excel file. The first row will have a label that describes the kind of data that column holds. The second row should have a column number (instead of column letters that Excel lists.) This seems trivial, but this column number will come in handy in a few minutes.
Step 1.1 – Working with the CSV file
This assumes that your CSV file has been created and that you are editing it in Excel. Insert two blank rows at the top of your CSV file and put a field name in the first row and a column number in the second.
Enter field names in the first row that describe what the data below represents.
When you have put this into Excel, the file should look like this:
|
Item |
Username |
password |
info |
notes |
|
1 |
2 |
3 |
4 |
5 |
|
Yahoo
Mail account |
me@yahoo.com |
Mypassword |
|
|
|
Main
Street Bank |
ATM |
1234 |
|
|
|
Fidelity
401k account |
123-45-3444 |
Boogie101 |
|
watch
the Contra Fund |
|
Work
network |
name |
Mypassword |
|
|
If all your records are the same type, such as login records, or all credit cards, then you can simply set the import function to set all the records up in the same general way with the same layout. If you have a mixture of credit cards, frequent flyer accounts, software registration keys, you can either import those separately - with different customized layouts - or insert columns into your Excel file to specify which type of record each row represents. In this example above, we have a mixture, so to keep things simple, we will just import the records.
Step 2 – Customize the DataVault Import Tool to Import your Records
The Import from CSV tool, after you identify the file to be imported, looks like this:
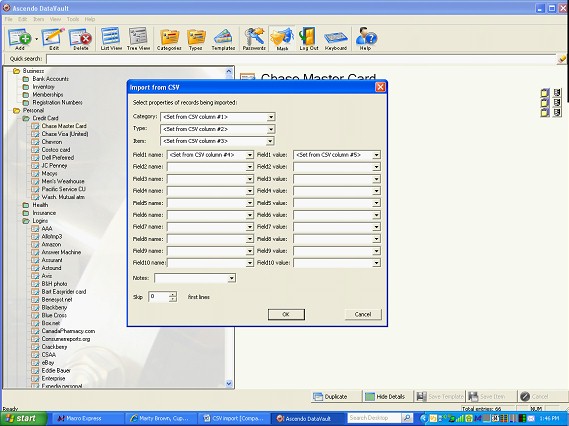
The import tool wants you to tell it:
- What category you want to bring your records into – usually categories are “Personal” or “Business”, but DataVault lets you create whatever category names you want.
- What type of records they are – the Type can be “bank accounts” or “Logins”, but again, DataVault is highly customizable.
- What each individual record should be titled – usually this is the first column data in your CSV file, such as "Yahoo Mail account".
- How to label the different the data you have in your columns in the CSV file and where that data is in your file. In other words, if you have a username field in your records, where is that data – column number-wise – in your CSV file.
- If you have notes records, what column number it is in.
DataVault’s CSV import function allows you to either name the field labels – by entering text into the Field Name box – or by putting that field name into a new column on each and every record in your CSV file. If you choose this second approach, then your Import tool will want to know what column number that label is in.
The Field Value box, on the other hand, should list the column number in which that data resides in your CSV file.
Assign a label and value entry for each column of data in your CSV file you wish to import. The next-to-last item in the import function box is a Notes area, so you can list that field location here. The last item allows you to skip the first X rows of information in your CSV file, so you don’t have to delete your field numbers and names in the first couple of data rows before uploading your file.
Before you click the OK button, check your CSV file for any blank columns between populated columns. It’s alright to have data in your file that you don’t use, but blank columns between data throws the import function for a loop. Also verify that your field value column numbers are correctly listed in the import box.
Step 3 – Import your Records
Click OK, then review your records in the Desktop version of DataVault. I find List View is the easiest way of looking at imported records, but if you find that your import didn’t work the way you wanted, switch to tree view so that you can easily delete all the records without selecting each item.